


You can create the crowning jewel to sit atop your gorgeous Christmas Joy tree with this stunning DIY Christmas Joy Tree Topper Christmas craft project.
Adorning the top of your meticulously decorated tree can be as simple as placing a classic star or a gorgeous angel. But if you are looking for something truly unique and show-stopping, and are feeling a little creative and crafty, making your own floral tree topper is the perfect solution.
Even a DIY floral tree topper doesn’t need to be complicated, you could simply arrange your favourite floral pieces at the top of your tree for a beautiful finish. Or you could really dress your tree to impress with a beautifully crafted, one-of-a-kind tree topper all of your own, like the Christmas Joy Tree Topper we have created here.
Placing and arranging all of the floral pieces together to create a complete arrangement gives your tree topper a lovely professional finish as well as giving you more control and fixed structure over where and how it all sits.
Below we will take you through the steps, and share our tips, of how to create a tree topper structure. And we’ll share what you need, and what you need to do, in order to create this Christmas Joy Tree Topper. You can use the exact same pieces, or you might opt to change and choose different elements to create a unique tree topper that perfectly complements your Christmas décor style.
What You’ll Need to Make your Christmas Joy Tree Topper
- Dry floral foam (the kind used for artificial floral displays – we used a brick but you could also use foam balls)
- Dowel – 1 x piece (approx. 1cm x 40-45cm)
- Selection of Floral Sprays – approx. 7 – 10 pieces depending on the size and structure of your display
- Selection of Feature Flowers – 1 x large flower or 3 x smaller flowers
- Ribbons and Bows (optional – if you’d like to include a feature bow as part of your tree topper arrangement)
- Hot glue gun
- Spray paint – colour matched to your tree (doesn’t have to be exact, but you will use it to camouflage the base pieces of the tree topper against your tree)
- Wire cutters
- Cable ties (optional – to secure to tree)
How to Create your Christmas Joy Tree Topper
Step 1
First, we’ll create a pick base to build your tree topper on.
Depending on the piece/type of floral foam that you are using, you might need to prepare it to the required size.
If you are using a foam brick, we suggest cutting a piece that is approx. 5cm wide off the end of the brick and that will leave you with a piece that is approx. 11cm high and 5cm deep
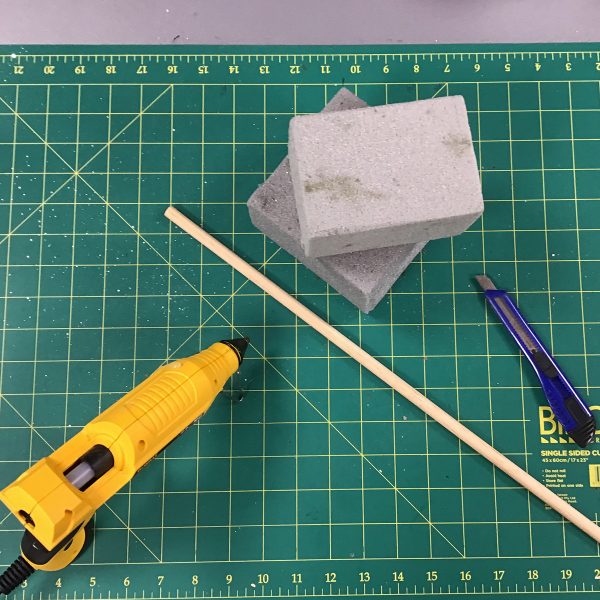
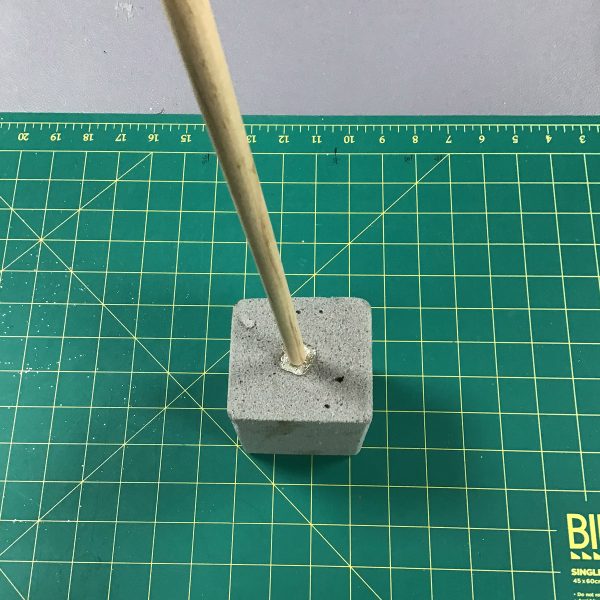
Next, use the point of scissors or a screwdriver to create a 1cm wide hole in the base of the foam brick. This is where you will insert the piece of dowel.
Apply some hot glue to the tip of the dowel and insert it into the hole you have created in the foam.
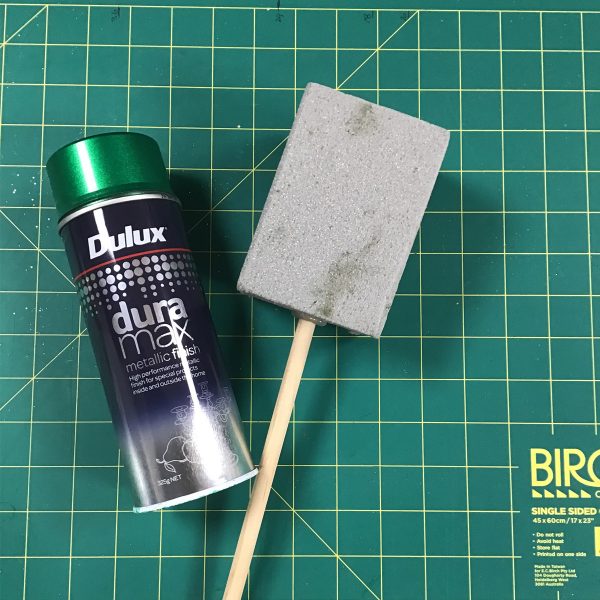
Spray paint the dowel and foam to match the colour of your tree. The intention here is to have the base pieces coloured as closely as possible to the needles on your tree so that they do not stand out when it is all put in place. If your foam is already green, then of course you won’t need to worry about painting it. You could also choose to cover the foam with a piece of artificial moss mat but it’s not really necessary as it will be heavily covered with all the lovely florals you are about to add.
Step 2
Select the floral pieces that you will be using for your display.
For a design like the one we have done, you’ll need approximately 10 pieces in total, across 3 or 4 different designs.


Indicatively, for the Christmas Joy Tree Topper, we have used:
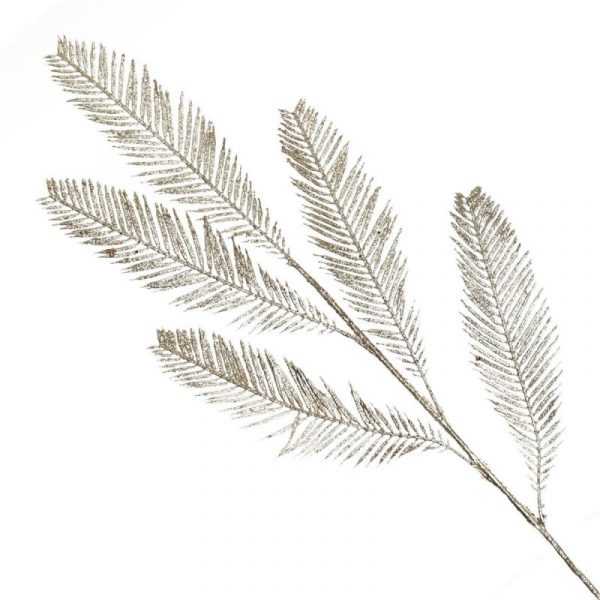
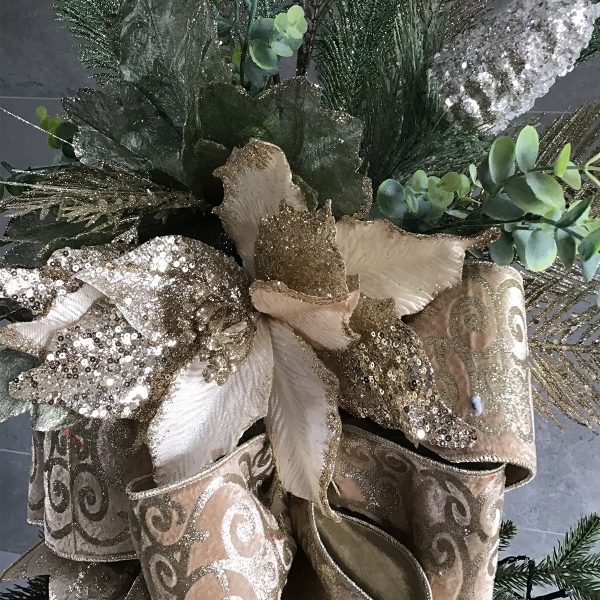
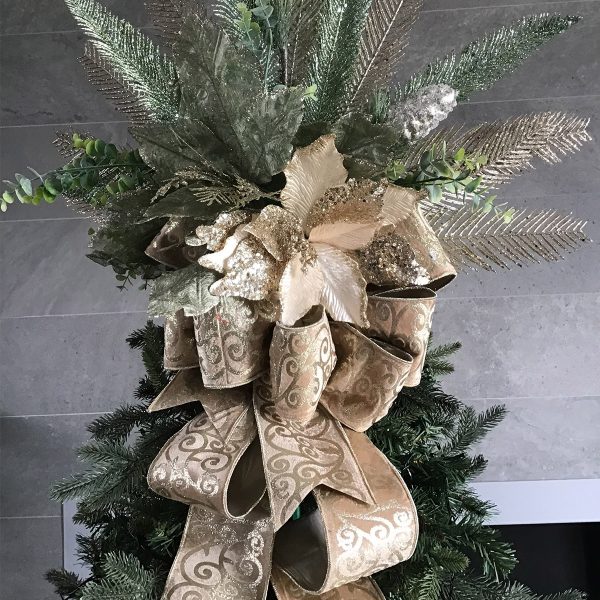
- 2 – 3 x Champagne Glitter Feather Spray
- 1 – 2 x Green Glitter Feather Spray
- 1 x Sage & Silver Pinecone Spray Trio
- 1 x Eucalyptus Bush Spray
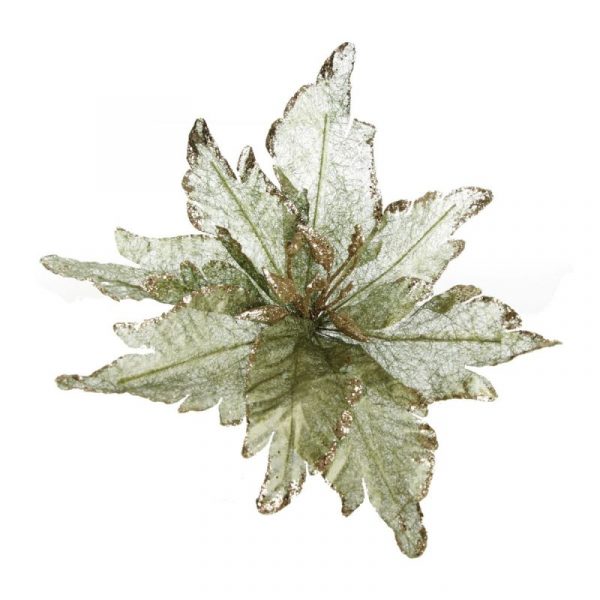
- 1 x Large Sage Fabric Poinsettia Flower Clip – feature
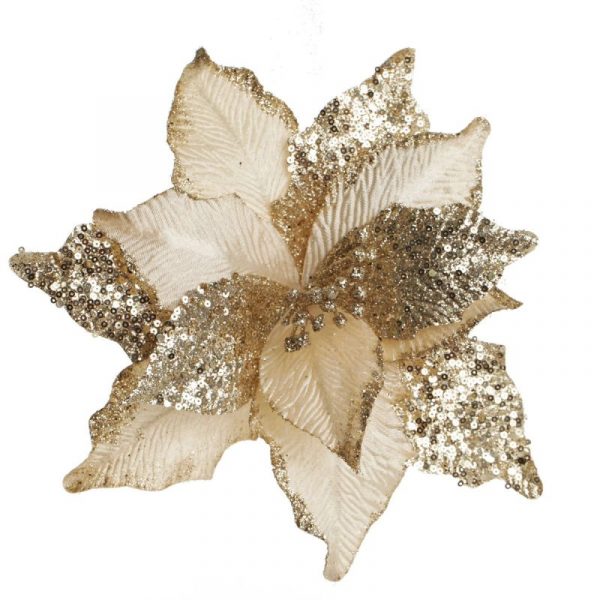
- 1 x Champagne and Cream Poinsettia Flower Clip – feature


We also have a Native Eucalyptus Leaf Christmas Spray with White Berries that would work beautifully as part of this arrangement. We didn’t use it this time, but you might like to.
Hints and Tips: There are a number of things to consider when deciding on which pieces you will use for your tree topper to make sure that you get the best possible visual outcome. These tips will come in handy when you are arranging your chosen pieces and designing your tree topper too.
Think about:
- Height: a tree topper is your chance to extend the beauty of your tree even taller and create maximum majestic and luxurious appeal. Choose a floral piece to sit tall at the top/back of your display. Sprays are perfect for this.
- Dimension: consider your tree topper as a multi-dimensional arrangement. Choose a variety of pieces with the view to extending them up, down, left and right. Which pieces look best sitting upright? Which lend themselves to draping and flowing forwards and to the side? You’ll need pieces of varying lengths to create a full and luscious display.
- Perspective – direction: remember that your tree topper will be placed up high, on the top of your tree. Depending on the height of your tree, this might mean that your tree topper is being viewed from the front, or perhaps even from below and looking up. But it is unlikely that it will be viewed purely from the top. Design and create your tree topper with the end perspective/viewing angle in mind for maximum impact.
- Perspective – tree position/placement: the position/placement of your tree will impact how you need to create your final tree topper piece. If your tree is in a corner or against a wall, then you’re tree topper won’t necessarily need to be decorated/completed on the reverse side that won’t be viewed. But if your tree is positioned in an open space and will be viewed from all sides/angles, then you’ll need to make sure that you create a tree topper that is full and complete when seen from all sides.
- Texture: be sure to choose floral pieces with a variety of texture to add plenty of interest to your tree topper. A combination of glitter and sparkles, natural-looking floral pieces and a variety of fabrics and materials will ensure an interesting and impressive feature at the top of your tree.
- Colour: just as a variety of textures helps to create interest, colour selection is important too. Choose colours from a co-ordinating palette and be sure to reference and complement the colours used throughout your tree and other Christmas décor for a beautifully co-ordinated overall finish.
Step 3
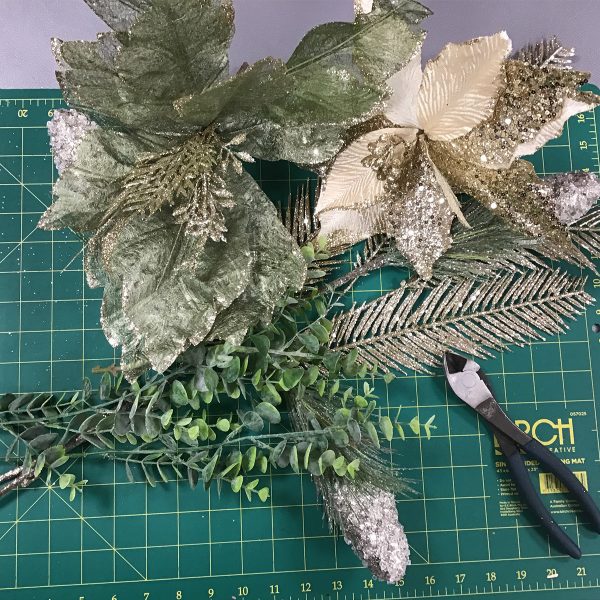
Now that you’ve chosen your floral pieces you need to get them ready for use.
Use wire cutters to deconstruct the sprays into individual stems/pieces so that you can disperse them throughout your arrangement. As you begin to place your pieces, you might find that you also need to cut the stems further to achieve the ideal length to suit your display. It’s always good to leave them longer first, and then you can slowly go smaller as and when you need.
You might need to also remove any clips that come pre-attached to some of our flowers. The clips are attached with some wire and a bit of glue but are easily removed. Add them to your craft kit for future projects.
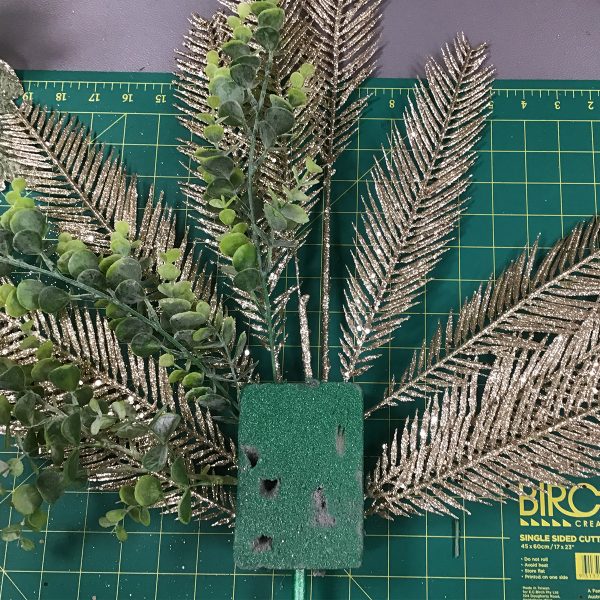
Then it’s time to start placing your pieces into the foam base.
Start with your tallest pieces at the back first. Insert them into the sides and top of the foam brick, towards the back edge, to create a fanned effect. Then place your next type of floral in front of those, still working on the sides and top of the brick.
You should insert each piece until it feels secure. Depending on the length and weight of each piece, this could vary but it will probably be approx. 3 – 5 cm. Larger/heavier pieces might need to be inserted a little deeper. Our floral sprays have wire stems so once inserted, you can then manipulate and position each individual piece to get them to sit exactly where and how you need them.
If you like, you could use hot glue gun to secure each piece for more stability and more permanent arrangement but it is not essential. The stems of the florals and the foam brick are quite strong so as long as you insert them deep enough that they feel secure, then you don’t need glue to hold them in place.
Not gluing the pieces means that you have the option and flexibility to change up the display next year and in the years to come. The great thing about florals is that they can be used again and again in so many different ways. What you use for your tree topper this year, could be used as part of a wreath or mantle display next year.
Continue placing all the periphery floral pieces on the sides and top of the floral brick until it is looking luscious and full. Don’t place your hero feature pieces yet. We’ll put those in once the base is in place on the tree.
Step 4
Once you are all done placing the periphery pieces, it is time to secure the base to the tree.
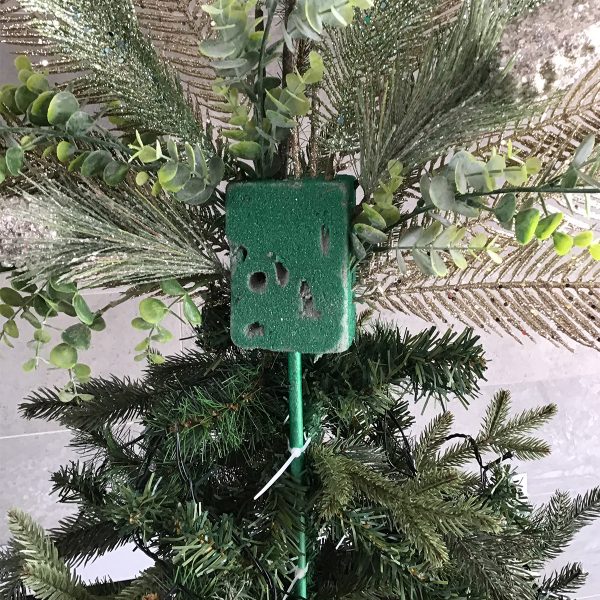
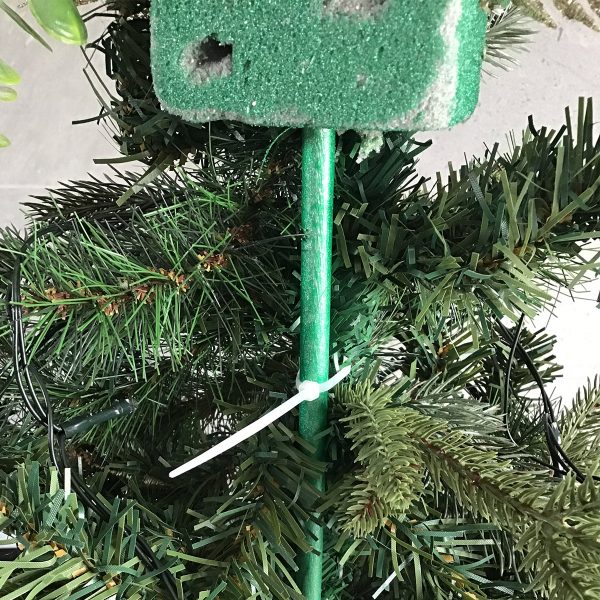
Use cable ties to securely attach your tree topper base to your tree. We suggest using at least one towards the bottom edge of the dowel, about 5 or 6 cm from the bottom and a second one further up the dowel, near to the highest and strongest point at the tip of the tree. Then, use the needles of the tree to camouflage the dowel and any other pieces of the foam base that might be visible by adjusting and arranging them as required.
Step 5
It’s time to add in your feature floral pieces.
At this point it is particularly important to consider the height and placement of your tree topper base. Now that it is in place on the tree, make sure that you position your feature florals for maximum impact from the viewing angle.
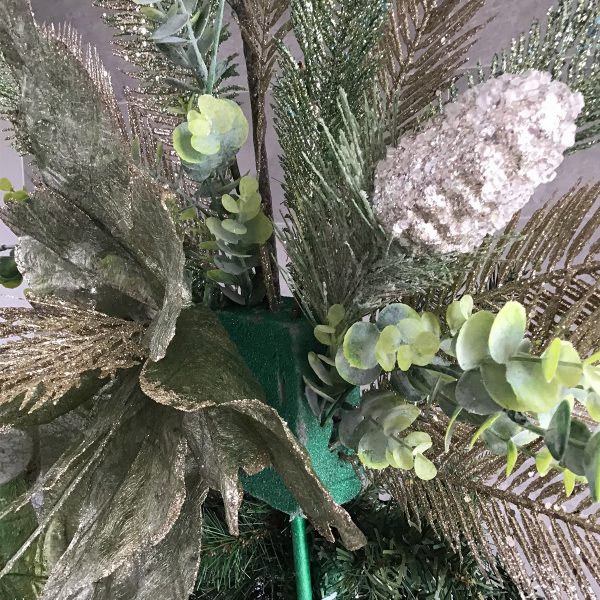
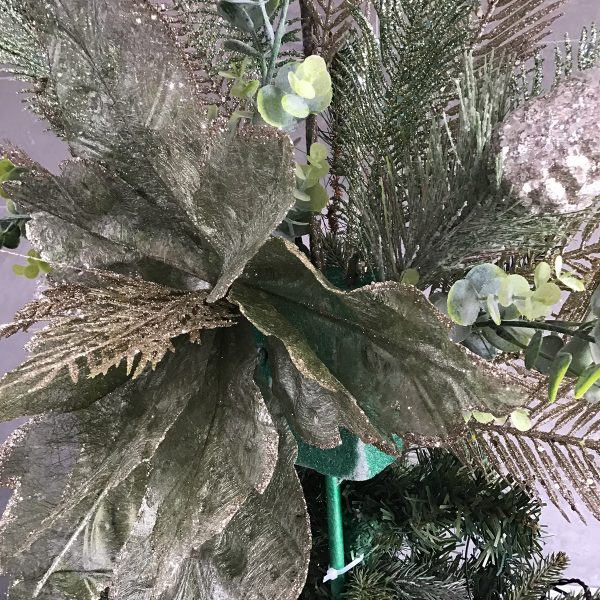
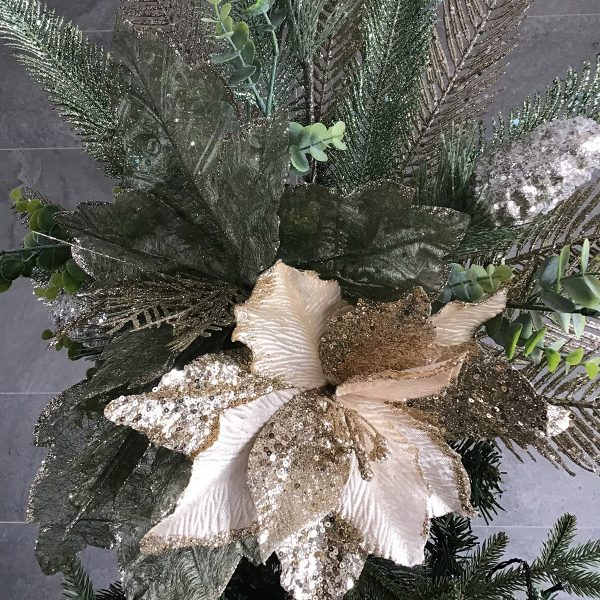
Nestle them together for a full looking finish. Once the flowers are in place, adjust the petals to get it looking just right.
Step 6
And the finishing touch is a gorgeous, cascading gold bow crafted from wired ribbon.

The options for creating a stunning floral tree topper really are endless. With the basic steps and tips we’ve given you here, and a little creativity you can produce something truly special to compliment the rest of your gorgeous Christmas décor.
For other Christmas craft and décor ideas be sure to check out the Christmas Craft section of our blog, as well as the Inspiration Gallery where you’ll find a range of inspiring Christmas décor collection ideas. And then find everything you need to get crafty and decorate your home for Christmas in The Christmas Cart’s online store.
To find out more about how we created the rest of the Christmas Joy collection, watch the Christmas Joy video and visit the Christmas Joy collection page.