


Crafts are one of the easiest ways to keep the little ones entertained – so why not get them involved in decorating the house! It’s sure to get the children excited about Christmas time, while adding a handmade homely feel to your decor.
Snowy Christmas Cups
 These festive jars or glasses are great either to serve your Christmas day beverages in, or fill with tea light candles to make Christmas lanterns for added warmth and glow around the house.
What You’ll Need
- A jar or drinking glass – use whatever you like here
- Silver or white paint
- Paint brush
- White craft glue
- Thick glitter or fake snow
- Floral picks, fake shrubbery, red and white twine, holly – whatever you’d like to decorate.
Method
- Coat the jar or glass in paint. If you’re intending for it to be used to drink, don’t cover the upper 3cm where one’s mouth would be.
- Once dry, coat the bottom half of the jar or glass in glue. Don’t be exact with the line – and do a few strokes extending above the halfway point (or as high as you’d like), to create a ‘just snowed’ dip-dyed effect.
- Sprinkle with glitter immediately. You may wish to press the jar or glass into the glitter for a thicker layer.
- If you’re using a jar, use your additional festive florals and twine to decorate the rim – or leave it plain. You can use your imagination here!
Reindeer Christmas Ornaments
What You’ll Need
- Medium sized polystyrene balls – between 7-9cm in diameter. (You can find these at your local craft store)
- PVA glue and brush
- Glitter
- Brown pipe cleaners
- Wire thread
- Skewers
- Large red bead, two smaller black beads
- Hot glue gun
Method
- Coat the polystyrene ball in PVA glue and cover in a complete layer of glitter
- Poke a skewer near the top of the ball, and allow it to come through the other side. This is where you will thread the wire through later to hang your reindeer from the tree. For now, leave the skewer in place and use this to hang the ball while it dries.
- Meanwhile, fashion two small reindeer antlers from your brown pipe cleaners, by twisting smaller pieces around two slightly longer ones.
- Once the glitter is dried, use the hot glue gun to attach the beads in the shape of two eyes and a red nose (for Rudolph of course!) Check that this is between the two holes you’ve made, so that the decoration faces outward when hung on the Christmas tree.
- Make two shallow holes in place where the pipe cleaners antlers will be. Place hot glue inside the holes and quickly insert the antlers, holding in place until dry.
- Carefully thread wire through holes, and hang on the Christmas tree!
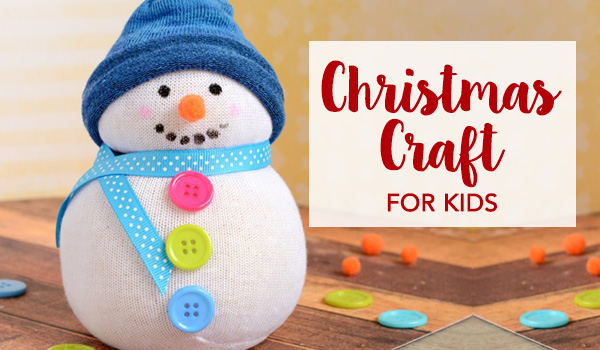
No Sew Sock Snowman
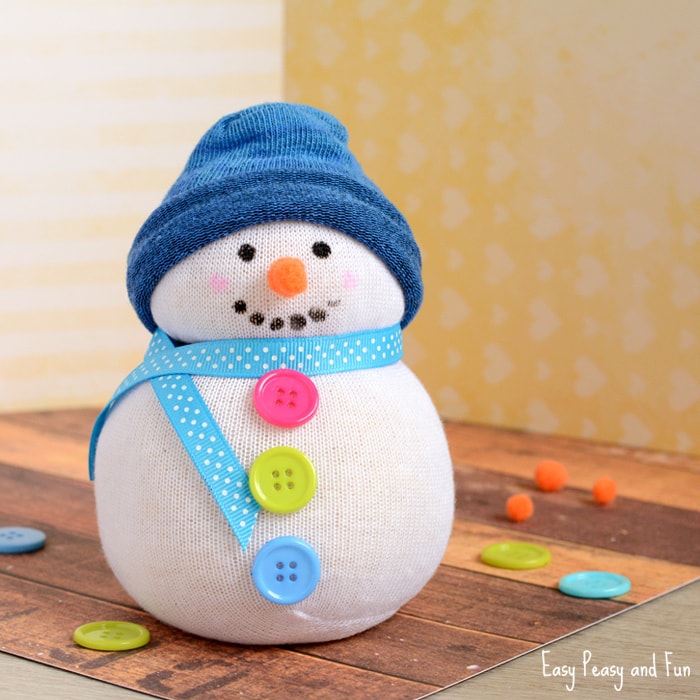
Source: EasyPeasyandFun.com
What You’ll Need
- 1 white sock
- 1 coloured sock for snowmans hat
- Rice
- Rubber bands
- Colourful buttons
- Ribbons
- Hot glue gun
- Markers or paint
- Orange pom poms
Method
- Start by filling your white sock with rice – don’t underestimate how much you’ll need!
- Once you’re happy with the size of your sock snowman, use a rubber band to secure the top closed. Slightly above the middle of the sock, use another rubber band to distinguish between the head and the body.
- Using the hot glue guns, place three different coloured buttons in a vertical line down the bottom half of the snowman.
- On the same side, use a black marker or paint to draw the mouth and eyes on the top half of the sock.
- Stick two orange pom poms together to create an elongated carrot nose, and place on the face.
- Add a ribbon for the scarf, attaching with glue gun to secure.
- Cut off the excess white sock.
- Cut the coloured sock just after the heel. Roll a little, then place on the head of your snowman as a beanie. You may wish to secure this with the hot glue gun.
Make Your Own Christmas Snowglobes
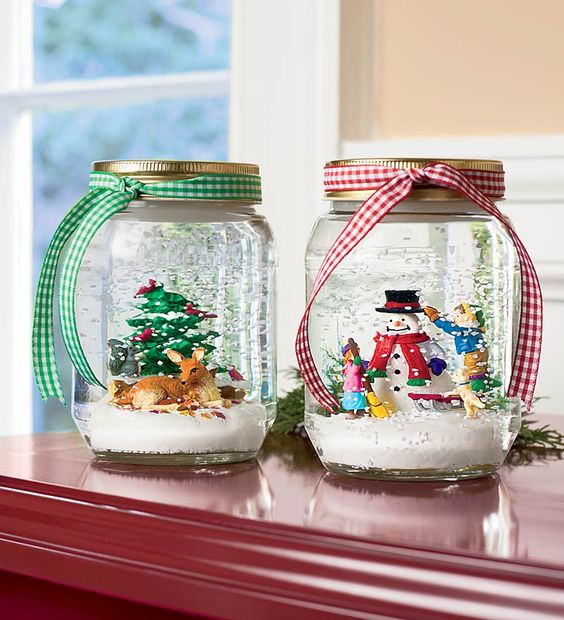
What You’ll Need
- Mason Jar
- Water
- Pure glycerin
- Glitter (our favourite!). Silver or white is ideal for snowflakes.
- Waterproof glue
- Small waterproof toys and Christmas figurines
Method
- Remove your mason jar lid and use this as your base for your beautiful magical snowglobe town.
- Decide where you’d like to place your Christmas toy figurines. Ensure that you will be able to close your jar once everything is in place. When you’re satisfied with the configuration, use the craft glue to affix them inside the jar lid. Set aside to dry
- Meanwhile, pour a tablespoon of glitter into your jar. You may add more or less depending on the size of your jar.
- Pour water into the jar. Do not fill to the top – take note particularly of the size of the figurines you have, and the volume that they will occupy. The water line should not reach the top.
- Add 3-5 drops of glycerin to the water – this will allow the glitter to fall slowly like Christmas snowflakes when you shake it.
- Check that your figurines are completely dry. Apply waterproof craft glue around the rim and thread of the jar to form a seal. Close tightly. Apply glue to the outside seam of the lid to help keep it watertight.
- Once dry – shake and enjoy!