Make and Create: Peppermint Candy Christmas Gingerbread House
Gather Your Supplies
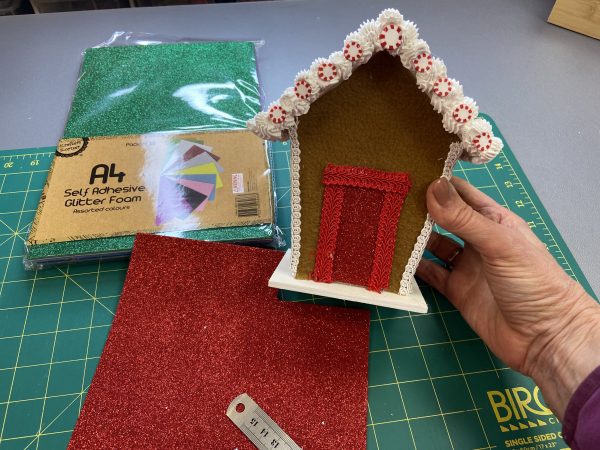
Like any craft project, the first thing you need to do is to get all of your supplies and tools at the ready. There's so many options for covering and decorating your Peppermint Candy Christmas Gingerbread House. We'll take you through what we used, and step by step how we created, the red and white house (pictured centre below) but as you can see there's endless options changing up the materials and embellishments to suite your Christmas decorating and colour theme. [gallery size="medium" ids="https://www.thechristmascart.com.au/blog/wp-content/uploads/2021/09/Peppermint-Candy-Christmas-Gingerbread-House-purple-candy-complete-front.jpg|,https://www.thechristmascart.com.au/blog/wp-content/uploads/2021/09/Peppermint-Candy-Christmas-Gingerbread-House-complete-front.jpg|,https://www.thechristmascart.com.au/blog/wp-content/uploads/2021/09/Peppermint-Candy-Christmas-Gingerbread-House-pastel-complete-front.jpg|"] For the Peppermint Candy Christmas Gingerbread House you'll need:- Wooden Bird House
- White Glitter Foam Sheets - for the roof and base
- Brown fleecy material - for the walls (front/back/sides)
- Selleys Spakfilla - for the faux icing/snow
- Piping Bag with your choice of nozzle - bag can be canvas or disposable and we used a medium sized rose shape nozzle
- White braid or similar ribbon/trim - for the corners/joins
- Red Glitter Foam Sheet and Braid
- Selection of craft supplies pieces to decorate your house - we used plastic mini peppermint lollies and mini candy canes
- Craft knife
- Scissors
- Hot Glue Gun
- Wire cutters
Get Prepped
Once you have gathered all your supplies, it's time to start preparing the various bits and pieces.Step 1 - Cut Out the Different Materials
There's a number of different materials and shapes that combine to cover your gingerbread house. We've prepared a pattern to guide you in cutting the pieces that you'll need for the front, back, sides, roof and base of the Peppermint Candy Christmas Gingerbread House. 1. Download the pattern and cut out the 4 shapes. First we'll do the front, back and sides. 2. Pin the front/back and sides pattern pieces to the brown piece of fabric. As you need to cut 2 of each of these pieces you can fold the material over and cut 2 pieces out at once. [gallery columns="4" size="medium" ids="https://www.thechristmascart.com.au/blog/wp-content/uploads/2021/09/Peppermint-Candy-Christmas-Gingerbread-House-Pattern-pg1.jpg|,https://www.thechristmascart.com.au/blog/wp-content/uploads/2021/09/Peppermint-Candy-Christmas-Gingerbread-House-Pattern-pg2.jpg|,https://www.thechristmascart.com.au/blog/wp-content/uploads/2021/09/Peppermint-Candy-Christmas-Gingerbread-House-Pin-Pattern-Pieces-Front-Back-Sides-scaled-e1631078856346.jpg|,https://www.thechristmascart.com.au/blog/wp-content/uploads/2021/09/Peppermint-Candy-Christmas-Gingerbread-House-Cut-4-Pieces-Front-Back-Sides-scaled-e1631078867268.jpg|"] Next, we'll do the pieces for the roof and the base. 3. On the reverse side of the white glitter foam sheet, trace around the base pattern piece. [gallery columns="5" size="medium" ids="https://www.thechristmascart.com.au/blog/wp-content/uploads/2021/09/Peppermint-Candy-Christmas-Gingerbread-House-cut-out-white-EVA-base-materials-scaled.jpg|,https://www.thechristmascart.com.au/blog/wp-content/uploads/2021/09/Peppermint-Candy-Christmas-Gingerbread-House-cut-out-white-EVA-base-place-pattern-piece-reverse-side-sheet-scaled.jpg|,https://www.thechristmascart.com.au/blog/wp-content/uploads/2021/09/Peppermint-Candy-Christmas-Gingerbread-House-cut-out-white-EVA-base-trace-pattern-piece-scaled.jpg|,https://www.thechristmascart.com.au/blog/wp-content/uploads/2021/09/Peppermint-Candy-Christmas-Gingerbread-House-cut-out-white-EVA-base-cut-craft-knife-1-scaled.jpg|,https://www.thechristmascart.com.au/blog/wp-content/uploads/2021/09/Peppermint-Candy-Christmas-Gingerbread-House-cut-out-white-EVA-base-cut-craft-knife-2-scaled.jpg|"] 4. Use a craft knife and metal ruler and cut out the base piece from the sheet. 5. Follow the same process to cut out the roof pieces. You'll need to do it twice to create the 2 x roof pieces. You like to use a ruler to guide you, both when tracing the pieces and cutting the sheets too. [gallery columns="2" size="medium" ids="https://www.thechristmascart.com.au/blog/wp-content/uploads/2021/09/Peppermint-Candy-Christmas-Gingerbread-House-cut-roof-scaled-e1631653664143.jpg|,https://www.thechristmascart.com.au/blog/wp-content/uploads/2021/09/Peppermint-Candy-Christmas-Gingerbread-House-cut-braid-scaled-e1631653676666.jpg|"] 6. Cut 5 pieces of braid or your chosen trim. You will need 4 x 11 cm long for the sides of the house and 1 x 10cm long for the roof of the house. You can use any braid or trim you like here, it just needs to be about 1.5cm wide. Step 2 – Prepare the Birdhouse 7. To prepare the birdhouse (ready for it's transformation to a gingerbread house!) cut the little perch off the front with a wire cutter. [gallery columns="2" size="medium" ids="https://www.thechristmascart.com.au/blog/wp-content/uploads/2021/09/Peppermint-Candy-Christmas-Gingerbread-House-cut-perch-birdcage-scaled.jpg|,https://www.thechristmascart.com.au/blog/wp-content/uploads/2021/09/Peppermint-Candy-Christmas-Gingerbread-House-cut-perch-birdcage-done-scaled.jpg|"] Optional step: it’s a good idea to paint the edge of the bottom of the birdhouse white. This will make sure that if any of it is showing once it is all decorated, it will blend in.Put Your Peppermint Candy Christmas Gingerbread House Together
Step 3 – Glue the Sides, Front & Back
8. Gather the 4 pieces of brown material that you cut out earlier (front, back and 2 x sides) and your trusty hot glue gun. 9. Starting with the sides, put hot glue around the edges of the birdhouse, position one of the side pieces of material at the top and gradually and gently pull the material down and stretch it out so that it reaches all edges. 10. Repeat the same process to cover the other side, and the front and back. [gallery columns="4" size="medium" ids="https://www.thechristmascart.com.au/blog/wp-content/uploads/2021/09/Peppermint-Candy-Christmas-Gingerbread-House-apply-glue-side-scaled.jpg|,https://www.thechristmascart.com.au/blog/wp-content/uploads/2021/09/Peppermint-Candy-Christmas-Gingerbread-House-material-glued-side-scaled-e1631082012413.jpg|,https://www.thechristmascart.com.au/blog/wp-content/uploads/2021/09/Peppermint-Candy-Christmas-Gingerbread-House-apply-glue-front-scaled.jpg|,https://www.thechristmascart.com.au/blog/wp-content/uploads/2021/09/Peppermint-Candy-Christmas-Gingerbread-House-material-glued-all-scaled.jpg|"] 11. Once all the pieces of brown material are on, put some hot glue down the edge of one of the corners then place one of the 4 x pieces of braid on top of the glue to cover the rough edges of the material and create a neat corner edge. [gallery size="medium" ids="https://www.thechristmascart.com.au/blog/wp-content/uploads/2021/09/Peppermint-Candy-Christmas-Gingerbread-House-apply-glue-corner-braid-scaled-e1631082069253.jpg|,https://www.thechristmascart.com.au/blog/wp-content/uploads/2021/09/Peppermint-Candy-Christmas-Gingerbread-House-attach-braid-corner-scaled-e1631082085224.jpg|,https://www.thechristmascart.com.au/blog/wp-content/uploads/2021/09/Peppermint-Candy-Christmas-Gingerbread-House-attach-braid-corner-all-scaled.jpg|"] 12. Do the same for the other 3 corner edges.Step 4 – Glue the Roof
13. Put some hot glue around the edges of one side of the roof (and a little through the middle for good measure), place one of the white glitter foam roof pieces on the top and press down firmly. 14. Repeat with the other side. [gallery size="medium" ids="https://www.thechristmascart.com.au/blog/wp-content/uploads/2021/09/Peppermint-Candy-Christmas-Gingerbread-House-apply-glue-roof-scaled.jpg|,https://www.thechristmascart.com.au/blog/wp-content/uploads/2021/09/Peppermint-Candy-Christmas-Gingerbread-House-apply-roof-braid-scaled.jpg|,https://www.thechristmascart.com.au/blog/wp-content/uploads/2021/09/Peppermint-Candy-Christmas-Gingerbread-House-attach-braid-corner-all-1-scaled.jpg|"] 15. Put some hot glue on the peak of roof and then place the last piece of braid on top and press down firmly to cover the join. And that is the base of your gingerbread house all done and ready for decorating!Decorate Your Peppermint Candy Christmas Gingerbread House!
Step 5 – Ice & Decorate your Peppermint Candy Christmas Gingerbread House
Now it's time for the real transformation to begin! 16. Fit your piping bag with a nozzle. You can use any nozzle you have/prefer however a medium sized rose shaped is perfect as it is very forgiving if your piping technique isn't exactly professional status! 17. The “frosting” on this faux gingerbread house is actually lightweight spackle or filler which is normally used to fill in holes in plaster board. I have chosen to use the Spakfilla brand as I found this to be the whitest of the ones I tried. If you have another brand and it’s a bit grey, you could add some white acrylic paint to it. Just be careful to not to add to much so that it doesn’t go too runny. The main thing is to make sure it is lightweight. From here on I will refer to our spackle as “frosting”. [gallery size="medium" ids="https://www.thechristmascart.com.au/blog/wp-content/uploads/2021/09/Peppermint-Candy-Christmas-Gingerbread-House-piping-bag-frosting-scaled.jpg|,https://www.thechristmascart.com.au/blog/wp-content/uploads/2021/09/Peppermint-Candy-Christmas-Gingerbread-House-fill-piping-bag-scaled.jpg|,https://www.thechristmascart.com.au/blog/wp-content/uploads/2021/09/Peppermint-Candy-Christmas-Gingerbread-House-twist-hold-piping-bag-frosting-scaled.jpg|"] 18. Mix your frosting with a spoon to loosen it up in the container. 19. Fill your piping bag with frosting and push it to the bottom of the bag, pushing all the air out of the bag as you go. Twist the top of your bag to keep all the frosting in. 20. Holding one hand firmly at the top of the bag and the other loosely around the centre of the bag, gently apply pressure with the hand around the middle of the bag and start piping. [gallery columns="4" size="medium" ids="https://www.thechristmascart.com.au/blog/wp-content/uploads/2021/09/Peppermint-Candy-Christmas-Gingerbread-House-piping-frosting-roof-front-scaled.jpg|,https://www.thechristmascart.com.au/blog/wp-content/uploads/2021/09/Peppermint-Candy-Christmas-Gingerbread-House-piping-frosting-roof-side-scaled.jpg|,https://www.thechristmascart.com.au/blog/wp-content/uploads/2021/09/Peppermint-Candy-Christmas-Gingerbread-House-piping-frosting-back-scaled.jpg|,https://www.thechristmascart.com.au/blog/wp-content/uploads/2021/09/Peppermint-Candy-Christmas-Gingerbread-House-piping-frosting-roof-2-scaled.jpg|"] 21. Pipe around the edges of the front, back and sides of the roof using small pushes on the middle of the bag. I found it easier to lean it back whilst I was piping so I could get it on the edge of the roof. You may also find it helpful to put your gingerbread house on something, like a cake stand, to raise it up to a height that is more comfortable for you to work at. If you do you make a mistake, bump it, put your fingers in it (I might have done that a few times!) or are just not happy with the frosting, just gently remove it and put it back in the piping bag and do it again. However, don’t be too hard on yourself! Once you get your other decorations and embellishments on, you won’t notice a little extra blob here and there.Step 6 – Decorate the Roof
Here comes the fun part! 22. Whilst your frosting is still wet, add some decorations and bring your gingerbread house to life. I’ve used some faux peppermint lollies around the edge of the roof.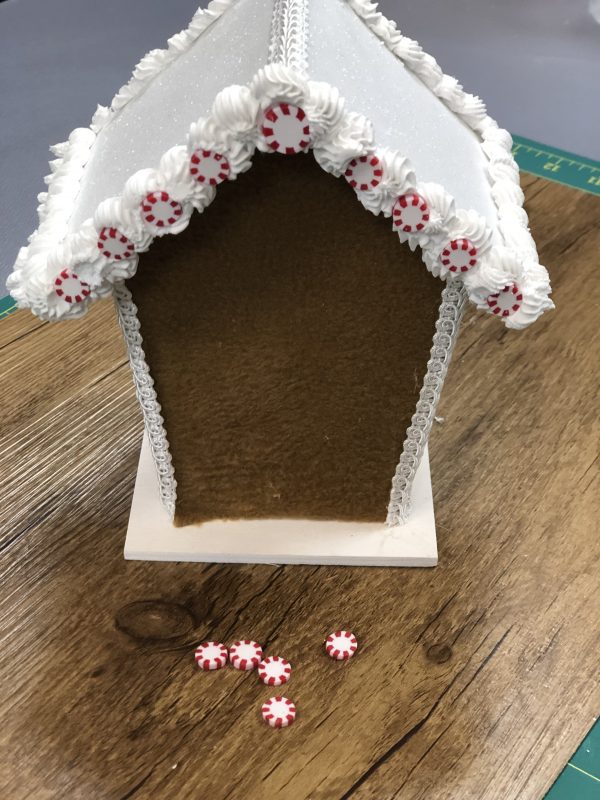 23. I cut a door in red glitter foam and trimmed it in red braid. You can get creative and decorate yours with whatever, and however, you like.