


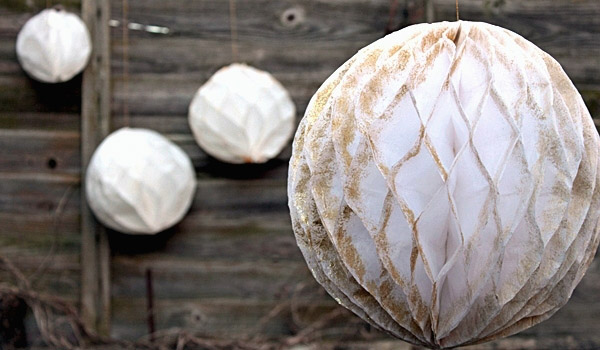
Hanging ornaments look great at Christmas celebrations, especially when you’ve made them yourself! Get crafty and create these sparkly honeycomb Christmas balls, perfect to hang above your table as a hanging centrepiece for your Christmas in July dinner.The great thing about honeycomb balls are that you can use them as decorations all year round at any celebration or event! Make different sized balls and cluster them together or tie them together to make a garland.
Glitter Honeycomb Christmas Balls – You’ll Need:
- Tissue paper
- Glitter
- Glue stick
- Paint brush
- Cutter
- Scissors
- Cutting mat
- Pen
- Two plates
- 3 A4 pieces of cardboard
- Ruler
- Stickytape
- Thread and needle
Paper
- Place two A4 cardboard cards on the working surface next to each other. Place a big plate or any other circular object with a diameter of around 26cm on top of the cardboard. Once the plate is correctly placed in a central position, trace around the outline of the circle with a pen.
- Making sure you keep the cardboard in place, remove the big plate and place a smaller plate or another object with a diameter about 20cm inside the bigger circle. Keeping it steady in the center with one hand, trace around it using the other hand. Now cut out the bigger circle. You will end up with two semi-circles.
- Place one semi-circle on top of a pile of tissue paper. Keep the tissue paper layered and aligned. Holding firmly together the cardboard and the tissue paper, cut the tissue paper in semi-circles.
- For one honeycomb ball, you will need around 50 sheets of tissue paper. Once the tissue paper semicircles are ready, cut out the inner circle of the cardboard. Then trim along the outer edge of the cardboard circle to give it a slightly smaller outline than the tissue paper.
Glitter
- Place the first piece of tissue paper on some cardboard. Gently apply a layer of craft glue to the edge of the semi-circle. Use gentle movements that go outwards of the circle, while holding the tissue paper in place with the other hand. Once you apply the glue, sprinkle some glitter on top.
- When you’ve finished with the first sheet, shake it over the cardboard and put it aside to dry. Then, place the excess glitter back in the container. Repeat this process for all 50 sheets. When the glue is dry, add some glitter to the other side as well.
Guide
- You need to create a guide to help you with the gluing process. Take an A4 piece of cardboard and measure every 4cm. Place the card on a cutting mat and cut out seven horizontal thin slots using a cutter and a ruler.
- Use a black marker to mark every other slot. Attach the left edge of your card to your working surface with some sticky tape. Now you’re ready to glue.
Gluing Together
- Flip the card to the left. Place the first tissue paper semi-circle flat on the working surface with the left side lined up against the edge of the cardboard. Make a mark on the cardboard at the spot where it meets the top edge of the semi-circle. By doing this, you can place all of your sheets of tissue paper in the exact same place. The cardboard will help you align the left edge of the tissue paper.
- Now flip the cardboard over the semi-circle, and use a soft glue stick to glue the tissue paper through the slots in the cardboard. On the first sheet, just glue along the black slots.
- The cardboard not only helps you keep a precise line for gluing, but it also protects the delicate tissue paper from tearing. Overall, it makes the whole process of gluing 50 sheets of tissue paper much easier.
- Once you’ve glued the first sheet of tissue paper, flip the cardboard to the left and place a new sheet of tissue paper on top of the first. Keep in mind to place it exactly aligned to the first one. Using both hands, rub the tissue paper to prevent any creases and to ensure the sheets are glued together along the glue lines. Now flip the cardboard back over again, and this time only glue along the unmarked slots. Repeat this process, alternating between the slots, for all 50 sheets of tissue paper.
Binding
- Take the cardboard pieces you created earlier (1, step 3). Securely glue one cardboard semi-circle on to one side of your pile of tissue paper semi-circles, and the other on the other side.
- Thread your needle and insert it into the top corner of your cardboard semi-circle. Make sure the loop of thread is loose, so that it leaves enough space for all the tissue paper to open around it and form the ball. Knot the thread and repeat the same process at the bottom corner. Leave one end of the thread long so that you can hang the honeycomb ball from it.
Source: Crafts Tuts Plus
For more Christmas craft ideas, visit our Pinterest page.