


There’s nothing quite like the tradition of a little Christmas cooking with the kids. Popular among kids and parents alike for the good times, treasured memories and yummy treats that ensue, Christmas cooking with the kids is a Christmas pastime that is enjoyed by all.
Get the kids busy in the kitchen and stir up some festive spirit with these tasty (and fun!) Christmas treat recipes.
Candy Cane-Chip Cookies
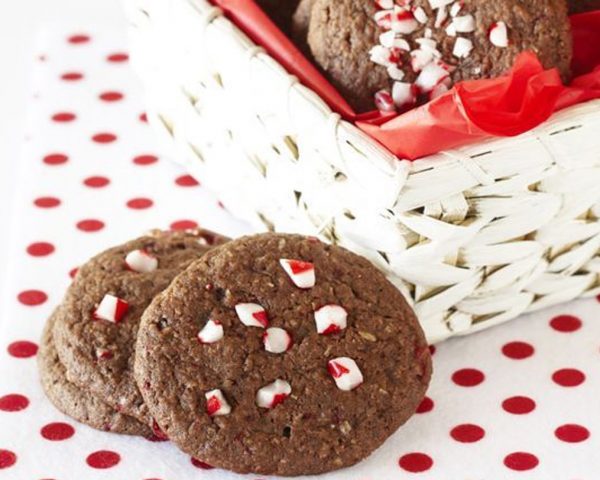
Delivering on all the key points of the “Three Cs” criteria – chocolate, cookie, candy cane – these Candy Cane-Chip Cookies are a sure fire hit with the kids. Easy to make and delicious to eat.
Prep: 0:20 Mins
Cook: 0:15 Mins
Serves: 12
INGREDIENTS:
- 125g butter
- 2/3 cup brown sugar
- 1 teaspoon vanilla essence
- 3/4 cup plain flour
- 2 tablespoons cocoa powder, sifted
- 1/3 cup desiccated coconut
- 10 mini candy canes
- 1 egg
METHOD
Step 1
Preheat oven to 160C or 140C fan. Line two large baking trays with non-stick baking paper. Place candy canes in a snap-lock bag. Lay bag on a folded tea towel on a hard surface (a cement path is good) and hit with a hammer to break up the candy canes.
Step 2
Using an electric beater, beat butter, sugar and vanilla until light and creamy. Add egg and beat well. Mix in flour, cocoa powder and coconut using a flat-bladed knife. Mix in only 2/3 of the crushed candy canes. Refrigerate for 30 mins until firm.
Step 3
Roll heaped tablespoons of the mixture into balls. Place onto the prepared trays, leaving room for spreading. Press out until about 1cm thick. Bake for 15 mins swapping the position of the trays halfway through cooking so they cook evenly.
Step 4
As soon as cookies come out of the oven, sprinkle with the remaining candy-cane pieces and press in gently. Leave on trays for 5 mins then lift onto a wire rack to cool completely.
Recipe Source: www.taste.com.au
Chocolate Gingerbread House
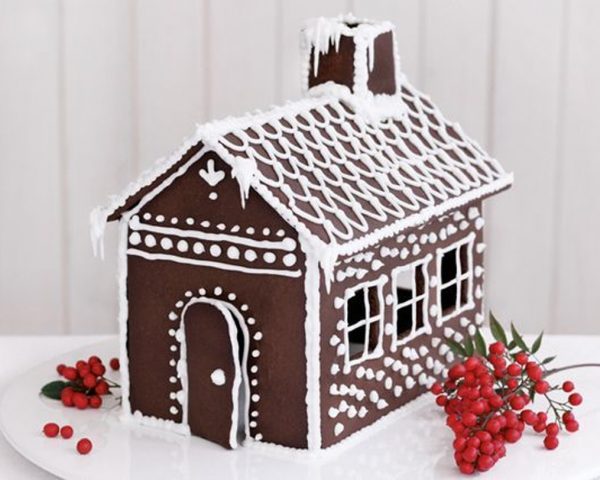
Gingerbread houses really are the perfect package – cooking and craft rolled into one. And the fact that this one is a Chocolate Gingerbread House makes it all the sweeter (literally and figuratively!).
Prep: 7:20 Hrs and Mins
Cook: 1:00 Hr
Serves: 1
INGREDIENTS:
- 250g butter, softened
- 1 cup (225g, firmly packed) brown sugar
- 1 cup (250ml) golden syrup
- 2 eggs, separated
- 4 1/2 cups (675 g) plain flour
- 1/2 cup (50g) cocoa powder, sifted
- 1 tablespoon ground ginger
- 1 teaspoon ground cinnamon
- 1/2 teaspoon ground cloves
- 2 cups (300g) pure icing sugar, sifted
- 2 teaspoons lemon juice
- 1 eggwhite, lightly whisked
METHOD
Step 1
Preheat oven to 180°C. Line three oven trays with baking paper. Use an electric mixer to beat the butter, sugar and golden syrup together until pale and creamy. Add the egg yolks and beat until just combined. Add the flour, cocoa powder, ginger, cinnamon and cloves and stir to combine. Use your hands to bring the dough together. Turn onto a lightly floured surface and gently knead until smooth. Cover with plastic wrap and place in the fridge for 30 minutes to rest.
Step 2
Divide the dough into six even portions. To make a side wall, roll out 1 dough portion on a lightly floured surface until 5mm thick. Use a small sharp knife to trim into a 12 x 20cm rectangle and place on a prepared tray. Use a small sharp knife to cut 3cm squares to create windows. Repeat with a second dough portion. Bake in preheated oven for 15-20 minutes or until golden brown. Remove from oven and set aside on the trays to cool.
Step 3
Meanwhile, roll out another dough portion to a 5mm thick disc. Use a small sharp knife to trim to a 12 x 12cm square with 5cm pitch for roof. Place on a lined tray. Repeat with another dough portion. Bake in preheated oven for 15-20 minutes or until golden brown.
Step 4
Roll out the remaining 2 dough portions to 5mm thick disc. Trim to a 9.5 x 22cm rectangles. Cut out a 3cm square from a long side of each rectangle to create a hole for a chimney. Place on lined trays. Roll any remaining dough into four 3 x 5cm rectangles for the chimney. Cut a wedge out of 2 rectangles to allow for the roof pitch. Place on the lined tray. Bake for 15-20 minutes or until golden brown. Remove from oven and set aside to cool completely.
Step 5
To make the royal icing, place the icing sugar in a medium bowl. Add the lemon juice and half the egg white. Stir to make a firm paste, adding more eggwhite if necessary. Cover with plastic wrap directly onto the surface of the icing until required.
Step 6
Place icing into a piping bag fitted with a 3.5cm diameter plain nozzle. Pipe icing onto the sides and roof panels to decorate. Set aside for 30 minutes to set.
Step 7
To put the house together, pipe along the base and side of 1 wall panel. Stand on a flat serving platter, using a straight sided glass to support the wall. Repeat with the remaining wall panels to make the walls of the house. Set aside for 2 hours or overnight to set.
Step 8
Pipe around the top edges of the walls. Attach the roof panels. Pipe along the top of the roof to secure. Set aside for 2 hours to set.
Step 9
Decorate the roof and walls with remaining icing.
Source Recipe: www.taste.com.au
Mini Rudolph Cups

Everyone will love putting on an apron and helping to create these cute little characters. Mini Rudolph Cups are just the thing for Christmas cooking with the kids, because technically there’s not really any cooking. Have lots of fun together building (and eating!) these delicious Christmas-themed treats.
Prep: 1:20 Hr and Mins
Cook: 0:03 Mins
Serves: 6
INGREDIENTS:
- 60g packet milk chocolate cups (see note)
- 250g packet milk chocolate melts
- 12 mini star-shaped pretzels
- 6 red M&Ms
- 6 vanilla mini marshmallows, halved crossways
- 50g tube black writing icing
- 2 rainbow sour straps
METHOD
Step 1
Place chocolate cups on a tray. Reserve 1/4 cup chocolate melts. Place remaining melts in a heatproof, microwave-safe bowl. Microwave on MEDIUM (50%) for 1 to 2 minutes or until smooth, stirring with a metal spoon halfway during cooking. Spoon melted chocolate into a snap-lock bag. Snip off 1 corner. Pipe chocolate into each chocolate cup until full. Smooth tops. Refrigerate for 30 minutes or until set.
Step 2
Place remaining 1/4 cup chocolate melts in a heatproof, microwave-safe bowl. Microwave on MEDIUM (50%) for 30 seconds or until melted and smooth.
Step 3
Place 6 chocolate cups, top-side down, on a flat surface to form bodies. Using picture as a guide, and a little melted chocolate, attach remaining chocolate cups to bodies to form heads. Hold until secure.
Step 4
Cut 1 side off 2 pretzels to form antler shapes. Using the picture as a guide, use a little melted chocolate to attach pretzels to the back of 1 reindeer head. Hold until secure. Using a little melted chocolate, attach chocolate, attach 2 marshmallow pieces, cut-side down, to top of head to form eyes. Hold until secure. Use icing to draw 1 black dot on each eye to form pupils. Repeat process to make 5 more reindeer heads.
Step 5
Using a sharp knife and colours as a guide, cut sour straps lengthways into thin strips. Wrap 1 strip around neck of reindeer. Secure with a little melted chocolate. Repeat with remaining reindeers. Using a little melted chocolate attach 1 M&M to front of head to form a nose. Hold until secure. Set aside for 30 minutes or until firm. Serve.
*Note: If you are unable to find chocolate cups in stores, try substituting with Reese’s minis or other similar shaped filled chocolates.
Recipe Source: www.taste.com.au